Get a pilot’s-eye view from a remote-controlled aircraft
Photo: Zalman Joffe
The gaming world may soon get a shake-up with the introduction of the Oculus Rift, a 3-D head-mounted display that promises to be compact, comfortable, and reasonably priced. Reading about the DIY origins of this gadget got me wondering how hard it would be to cobble together something similar. Because I’m not a gamer, though, I didn’t immediately start investigating the possibility. Then I started to wonder whether a 3-D display could enhance a pastime I do enjoy—flying radio-controlled model airplanes outfitted with video cameras so they can be piloted in a mode known as first-person view (FPV).
I soon discovered a company offering this very thing through an Indiegogo campaign. The folks at EMR Laboratories, in Waterloo, Ont., Canada, have come up with a device they call Transporter3D. It can accept two analog video signals and combine them into a single digital output that can be displayed in 3-D on the Oculus Rift. Combined with EMR Laboratories’ stereo video camera, which goes by the much less evocative name 3D Cam FPV, the Transporter3D can provide model-aircraft owners with stereoscopic FPV capabilities.
All this seemed intriguing, but it wasn’t clear to me that a sense of depth would add significantly to the fun of FPV flying. And I didn’t want to sink the US $1000 or so it would cost to purchase the 3D Cam FPV, the Transporter3D, and an Oculus Rift developer kit to find out.
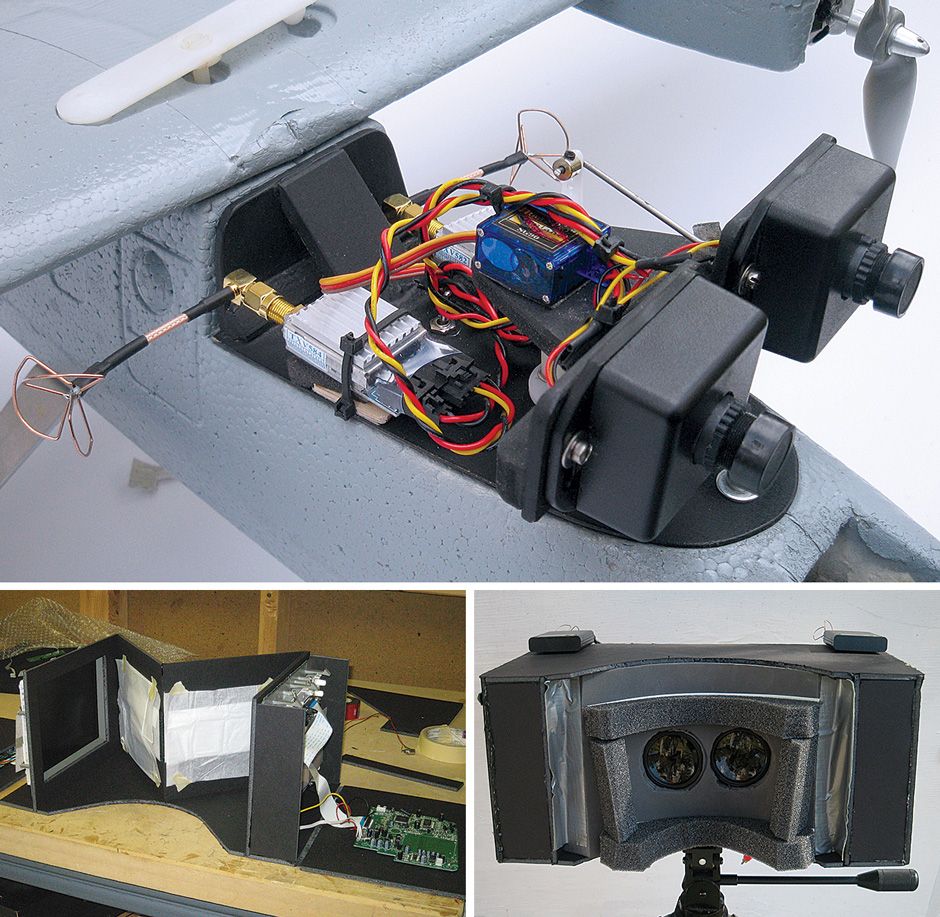
Photos: David Schneider (3)AIR SHOW: I mounted two video cameras on my plane to provide stereoscopic vision, each with its own transmitter [top]. Images were displayed on two screens in the headset [left] and then brought via mirrors to the eyepieces [above].
So to test the waters, I decided to cobble together a 3-D FPV setup on the cheap. In the end, I was able to do it for less than $250 in parts, although I don’t suppose the results I obtained were as pleasing as those you could get using an Oculus Rift with the EMR Laboratories’ gear.
Outfitting a model airplane with stereo vision was straightforward, if a little ungainly: I simply bought two identical cameras and two 5.8-gigahertz video transmitters and mounted them to the front of the plane. (Important note: To operate these transmitters legally in the United States, I needed my amateur radio license, so check your national regulations.) I attached the cameras to a home-brew pan-and-tilt mechanism, setting the separation between the cameras about equal to the distance between most people’s eyeballs.
The real challenge was how to view the two video streams stereoscopically on the ground. My first instinct was to build a mirror stereoscope along the lines of the equipment used to view aerial photos. I went ahead and did that, using four front-surface mirrors I had bought for a song from Surplus Shed and two 7-inch LCD screens that I purchased for $10 apiece on eBay.
These displays, originally intended for viewing movies from the backseat of a car, had been built into automobile headrests, but they were easy to extract. They offered decent resolution (640 by 480 pixels) and a 4:3 aspect ratio, which matched my video cameras.
But once I had my stereoscope jiggered together, I was disappointed. The long optical path created by the four mirrors made for a lot of distance between my eyes and the screens. This significantly reduced the amount of coverage across my field of view, so the setup didn’t feel at all immersive.
I went back to the drawing board and, after some poking around, discovered that I could set up LCD screens to flip the video output, either from left to right or up and down. So I redesigned my viewer, taking advantage of the LCD controls to flip the video images and eliminate two mirrors from my design. The remaining two mirrors, one in front of each eye, then flopped the views back to normal. This tactic reduced the optical distance between my eyes and the screens so that they covered much more of my field of view.
The rub was that the screens were now too close to focus on, especially for someone suffering middle-age farsightedness. The solution was to do exactly what’s done in the Oculus Rift: add lenses. At first I tried using the strongest reading glasses I could buy at the drugstore, but that wasn’t adequate. A couple of 3 x magnifying glasses ($4 each from Amazon) did the trick, however.
My viewer looks a bit like one of those early 20th-century cabinet stereoscopes that allowed users to view stereo-image pairs in 3-D. Had I made it out of wood with a nice rubbed finish, it might have resembled a genuine antique. But I just slapped it together using black foam-core board, polyethylene foam, and duct tape.
It’s probably a good thing that I hadn’t invested too much time in the aesthetics, because flying in FPV in 3-D with this viewer turned out to be disappointing compared with watching 2-D video. Although the perception of depth held up for surprisingly distant objects, the limited resolution of my LCD screens, combined with the magnifiers needed to view them, made me feel as though I was looking through a screen door, with the real world now resembling one of the blocky landscapes of Minecraft.
This wasn’t a surprise. Indeed, in reading about the Oculus Rift online, I noticed lots of discussion about “the screen-door effect” and efforts to eliminate it by adding an optically diffusive material in front of its display. The Oculus Rift developer kit provides 640 by 800 pixels per eye, which is better than my home-brew viewer, but the resolution is still too low for universal comfort, it seems.
The consumer version of the Oculus Rift will offer better resolution than the developer prototype, although it’s impossible to know right now whether it will be enough to eliminate the screen-door effect entirely. To my mind, making the world look pixelated takes more away from the experience of FPV flying than the 3-D effect adds. So for the moment, for my FPV flying, I prefer a world that’s flat.
This article originally appeared in print as “The 3-D View From Above.”
Android on a Roomba. Telemba is a affordable tele-presence robot kit. You can control the robot as a avatar of yourself, from distance via Internet. It consists of your Roomba, your Android tablet, and some parts we provides. You can own your robot very low cost if you have a Roomba and Android tablets! Check it out!
A sneak peak of the Q(x) hanging out in the Polycom lobby.
The Anybots Q(x) is the first new development in mobile telepresence technology from Anybots since the QB was introduced in 2010. The Q(x) model is designed to be integrated with many different technology platforms, employing the same self balancing technology of its predecessors with updated audio and video through the Polycom Group500 Codec. This development is the result of a Technology Innovation Partner Agreement with Polycom, encouraging innovative contributions to improve medical virtual presence technology and patient quality of life.
The press release of Anybot’s technology partnership with Polycom can be readhere
Botiful is the first consumer tele-presence robot. With Skype as a simple interface you or your friends can control the robot and be remotely present from anywhere in the world.
Be present with anyone, from anywhere !
Skype video calls - Botiful is fully integrated with Skype and is table top. You can move the robot and the head to look at the people you are talking to and follow them as they move
Baby monitoring - see everything you want to see, not just what is shown to you
Play remotely with kids - with Botiful, you can interact with kids and share their games
Safely inspectplaces you can't access yourself, like under a car
Invite distant buddiesto your favorite bar, or join them if you can't be present